Wondering how to grout tile correctly? It’s a fair question, especially since grouting is a job you have only one chance to get right. Once your tiles are installed in a perfect grid or chevron pattern, it’s time to finish up the job with an application of grout. You can also replace old grout with a new batch if things have started to look a little grimy. While it’s certainly not the most luxurious material you’ll use in a renovation, grout plays a big role in the final look of your tile project. With an array of colors to choose from, grout can be used to add contrast or create a sleek single-shade space.
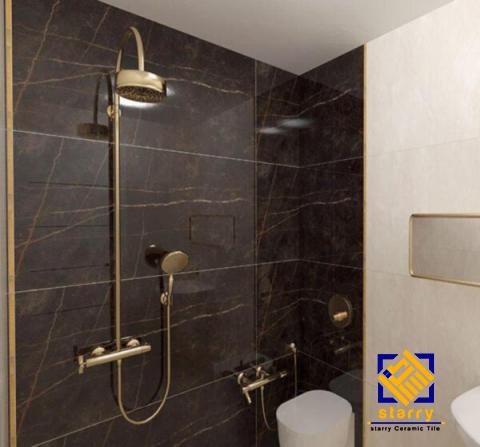
ceramic shower tiles
But before you break out the trowel, you need to be prepared for the task. After all, poorly grouted tile doesn’t just look bad, it is also less stable and more likely to chip or need repairs. So, to make sure you get the DIY job done right the first time, we talked to Dan Chollet, contract and installation lead at Fireclay Tile. Dan has 40 years of experience working with tile and has supervised large installation projects in Silicon Valley and Las Vegas—including the Apple II campus in Cupertino, California. With Dan’s help, we’ve created a comprehensive, step-by-step guide on how to grout tile. Read on and you’ll be ready to grout like a home improvement pro.
re Save on Pinterest Next Project Skip to main content Menu Family Handyman Logo Subscribe Home House & Components Parts Of House Floors How to Tile a Bathroom Floor Family HandymanFamily Handyman Updated: Mar. 26, 2022 Learn how to install tile — specifically, how to lay new ceramic tile over an old vinyl floor. Next Project Time Multiple Days Complexity Intermediate Cost $101–250 Introduction Whether you’re replacing an old shabby bathroom flooring tile or installing a new one, you can’t beat ceramic or stone tile for durability and appearance. When laid properly, it’s virtually a forever floor tiling that requires almost no care and maintenance. And you can select materials from a vast array of colors and textures. What’s equally attractive is that you can lay a first-class tile floor yourself, often in one weekend, and save the $500 to $1,500 cost of hiring a pro. If you’re comfortable using basic hand tools and have the patience to align tiles just right, you can handle laying tile. Tools Required 4-in. diamond blade Angle grinder Bucket Caulk gun Chalk line Cordless drill Drill mixer Drywall saw Dust mask Grout float Knee pads Margin trowel Nippers Notched trowel Offset saw Putty knife Safety glasses Scoring knife T-square Tape measure Tile cutter Utility knife Wet saw Materials Required #12×2″ stainless steel screws 1/4-in. tile backer board 1×4 guide boards 2-1/2- galvanized screws Acrylic additive Alkali-resistant mesh tape Backer board screws Backer rod Construction adhesive Duct tape Sanded caulk Sanded grout Silicone caulk Thin-set mortar Toilet extension ring Transition threshold Wax ring Estimating the Cost of a Tile Project The tile itself will be your biggest cost, so start by measuring the square footage of the floor. Then add 10 percent for cutting waste. If you choose a more complex layout than the simple grid pattern we used, your waste will be greater. Most tile sells for $5 to $15 per square foot, but you can spend as little as $3 or more than $50. If you have to install a backer board, add $2 per square foot to the cost of the tile. Other materials will cost about $90, regardless of bathroom size. The tile tools you’ll need (including a tile cutter) will total $60 to $80. Assess Your Floor The success of any tile job depends on a solid base — a floor that flexes very little as you walk across it. If you have a concrete subfloor, this isn’t an issue. You can lay tile directly over the existing vinyl as long as it’s well adhered. If possible, avoid tearing out vinyl flooring. Leaving it in place saves time, of course, but it also reduces asbestos hazard concerns. Asbestos was used in sheet vinyl and vinyl tile until the mid-1980s. By leaving the vinyl undisturbed, you won’t risk sending asbestos fibers into the air. If you have a wood subfloor, there’s a good chance you’ll have to install a backer board over your vinyl to make the floor thicker and stiff enough for tile. The easiest way to see flooring thickness is to pull off a floor register. Otherwise, look for plumbing passageways through the floor. As a last resort, drill through the floor with a one-inch or larger spade bit (your new floor will cover the hole later). To prevent asbestos dust from becoming airborne, mist the bit with a spray bottle as you drill. In addition to floor thickness, you’ll need to determine joist spacing. If there’s an unfinished basement or crawlspace below the floor, simply measure the spacing. If there’s a ceiling, probe for joists with a drill bit. If the joists are spaced 16 inches apart, the layers of structural flooring beneath the vinyl should add up to at least 1-1/8-in. With joists every 24 inches, you need 1-1/2-in. If your floor is too thin for tile, add a thicker layer of tile backer board. Our floor required 1/4-in.-thick backer. Yours might need 1/2-in. backer to reach the minimum thickness. If your floor is already thick enough, you can simply prep the vinyl floor (Photos 1 – 4) and skip the backer installation (Photos 5 – 8). Then tile directly over the vinyl, following the same steps we used over the backer board. Regardless of the type of subfloor, there are two situations where you can’t leave vinyl in place. First, if large areas of the vinyl are loose, don’t set tile or backer over it. Small loose spots are acceptable and easy to deal with (Photo 4). Second, “cushioned” sheet vinyl must be removed before you can set tile. Cushioned vinyl has a foam backing that makes it noticeably thicker and softer than standard vinyl flooring. It’s too spongy to support tile or backer board. Before removing it, call your local health department for instructions on how to check for asbestos and proper procedures if asbestos is present. Gather Advice While You Shop Home centers carry everything you need for this project, but begin shopping at a tile store, where you’re more likely to get expert advice on how to lay tile. Make a quick sketch of your floor plan and jot down all the dimensions. Also, take a photo of the floor at the doorway. This will help the tile store staff recommend a “transition” to neatly join the tile to the hallway flooring. Transitions come in different styles to suit any situation. When you choose the tile itself, ask if it requires any special installation steps. Some tile should be coated with grout release before grouting. Also, ask about cutting techniques for the tile. You’ll use sanded grout for the floor. Ask if sanded caulk is available in a color that matches your grout for the floor/tub and floor/wall tile joints. Pro tip: When learning how to install tile, understand that cement products like thin-set and grout draw moisture from the skin and can even cause burns that require medical attention. While most pros work bare-handed, wear gloves if you have any special sensitivity. Also, wear eye protection while mixing thin-set and grout.
How Much Is the Net Income of Tile’s Industry?
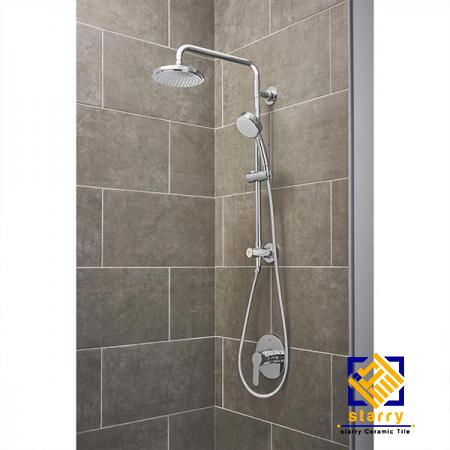 For the nine months ended 31 December 2021, Lanka Tiles PLC revenues increased 21% to LKR10.53B. Net income applicable to common stockholders increased from LKR1.18B to LKR2.83B. Revenues reflect Local Sales increase of 18% to LKR10.8B, Export Sales increase from LKR251.4M to LKR526.2M. Net income benefited from Net finance income / (cost) increase from LKR195M (expense) to LKR27.9M (income).ceramic shower tiles
It’s Your Choice We and our partners may store and access data on a device, such as cookies, and process personal data, such as unique identifiers, sent by a device to personalise content, tailor and report on advertising and analyse our traffic. By clicking “Yes, I Agree” you will allow the use of these cookies, and may change your settings at any time by clicking “Manage Settings” on our website. For certain purposes legitimate interests may be relied on. For further details or to object, click “Manage Settings”.
What’s the Capacity of Tile’s Packing Machine?
 Removing an old tile backsplash can seem like a daunting, maybe even infeasible task. There are questions like, ‘how do I begin to remove this wall essentially tiled with stone? If I remove the tile will I damage the drywall? What if I get in there and can’t finish?’ Or maybe just, ‘what the heck am I doing?’ I know because it’s how I felt before taking a hammer to my old tile backsplash. Well I’m here to tell you, YOU CAN DO IT! It all begins with the right tools and gear. OK ladies (and fellas..I know your reading this), put on your best demo outfits because this can and will get messy. Let’s get Dirty!
Tiles come in all shapes and sizes. As wonderful as this is, the huge variety can often make it difficult to know what you want. It is important to consider many different factors when deciding on tile sizes; the space you’re tiling, the impact you want them to make, the colour scheme and even the laying patterns. With so many factors, we are here to make the process that bit more simplified for you. So, stay tuned for a fast track pass to choosing the perfect tile sizes for your home. All tiles create impact in a room, so you must first decide on what impact you want them to make. The appearance of a bigger space? A bold and colourful eye-catching element on one wall? Or a splendid kitchen splashback? These are all very different and therefore require very different sized tiles! 1. BATHROOM STYLE First, let’s think about a compact bathroom and which tiles will optimise the space to give it a more spacious feel. To some it seems obvious but we are often asked to advise about tile sizes for bathrooms, especially smaller bathrooms. The best philosophy to go by is small bathroom…small tile. Large tiles work perfectly for the floor but when tiling a shower area or wall it is more appealing and effective to go for a smaller tile. A rectangular tile will help elongate the wall (both horizontally or vertically) the same way stripes would, choose a tile like Artisau. Try a herringbone laying pattern as this will help widen the appearance of the room whilst also drawing the eye upwards.
. KITCHEN STYLE A key feature in the kitchen is a splashback so you want to get it right. There are many ways to go in sizing but the most effective and most popular is to choose smaller tiles. Sometimes mosaics are a good choice but with many grout lines this could need a lot of maintanance in a kitchen space. Hexagon tiles are an effective choice adding a playful and modern touch. Add these to a minimal kitchen design for maximum effect and keep them relatively small to ensure they are more commanding to the eye. A timeless choice is to choose a linear brick bond with a 10x20cm sized tile, like Metro. Easy to clean, sophisticated yet subtle and a classic shape and size for an ageless kitchen.
Top Registered Wholesale Distributor of Ceramic Tiles
 The exclusive GEMINI ceramic wall and floor tile collection forms part of the CTD Tiles product portfolio, with each individual tile ranges handpicked and selected to appeal to every style, look and trend imaginable. The GEMINI Tile Collection is celebrating 30 years of tile inspiration with traditional styles and the very latest trends captivating the interiors world. GEMINI’s vast range explores beautiful natural stone tiles alongside textured décors, elegant mosaics and both classic and contemporary styles. CTD Tiles – Your Number One for Tiles! At CTD Tiles we aim to fulfil your needs when it comes to your tiling requirements. From bathroom tiles, kitchen tiles, wall and floor tiles, ceramic tiles, and porcelain tiles, we have it all. Our exclusive GEMINI ceramic wall and floor tile collection is showcased in our showrooms across the UK along with a wide selection of tile fixing products and accessories. Our stores offer a one stop shop for all your tiling needshome depot
About this item A blend of classic blue colors 48x48mm size easy to install and clean High quality and hugely versatile Non-slip surface that complies with the international norms Highly resistant to stains, marks, scratches, knocks, abrasions and chemical agents Lower water-absorption rate Suitable for: Swimming pools, kitchen and bathroom, spa center, patio, aqua projects, landscaping, any home interior and exterior designs.
Many Colors Pattern Available Polished Surface
With pool ceramic mosaic collection at GROSSO, you have a variety of surfaces choices to create endless possibility to your swimming pool: wave, classic, blossom, fambe, frozen, penny round, hexagon, and series of borders. Our ceramic mosaic will help you achieve a perfect swimming pool look to show your unique personality.


Your comment submitted.